

Using role-based filters in Dashboards
On this page
This guide explains how to create role-based filters in Dashboards, apply them to roles and view the role-based filters applied to your role.
Introduction
Use role-based filters to manage users’ data access rights in Dashboards in a scalable manner. Role-based filters allow users with Workspace Admin permissions to filter the data that users can see, depending on the role these users have.
Role-based filters are dimension filters. As a result, users with a role to which a role-based filter is assigned will only be able to see values for specific dimensions.
You can create and apply role-based filters in two ways:
-
Create a new role with a role-based filter
-
Apply a role-based filter to an existing role
Prerequisites
-
Role-based filters are disabled by default in Adverity. To enable this feature, contact your Account Manager.
-
In order to add a role-based filter to a role, you must have Workspace Admin (WA) permissions included in your role. To see the permissions you have, follow these steps:
-
Go to the Explore page.
-
In the top left corner, click
 Select workspace, then
 Administration.
-
In the Users & roles section of the administration menu, click Users.
-
Find your user account in the table and click Show in the row containing your user account details.
-
At the bottom of the page, you will see a table that shows the roles and permissions you have in Dashboards. If there is a check in the column for the Workspace Admin (WA) permissions, you will be able to create and apply role-based filters.
For more information on roles and permissions, see Managing user permissions in Dashboards.
Creating a new role with a role-based filter
To create a new role with a role-based filter applied, follow these steps:
-
Go to the Explore page.
-
In the top left corner, click
Select workspace, then Administration. -
In the Users & roles section of the administration menu, click Roles.
-
In the top right corner of the page, click + Add role to current workspace.
-
In Role Name, enter a name for the new role.
-
In the list, select the permissions to include in this new role. For more information on user permissions, see Managing user permissions in Dashboards.
-
In the Dimension filter section, click
 Add dimension filter to create a new dimension filter for the role. To add a new dimension filter, follow these steps as shown in the image below:
-
In Choose dimension, select the dimension to use in the filter.
-
In Filter by, select the dimension values that the users assigned to this role can see. To select all the values for the selected dimension, click Select All.
-
(Optional) To add another dimension filter, click + Add Filter.
-
(Optional) To hide the selected dimension value from the user, select the Exclude checkbox.
-
Click Apply.
-
-
(Optional) To save the role-based filter as a filter template, click
 Save as filter template, enter a name for the filter template, and click Apply.
-
(Optional) To load a role-based filter from a filter template, click
 Load filter template, select the filter template to use, and click Apply.
-
Click Create.
As a result, you have created a role with a role-based filter applied to it.
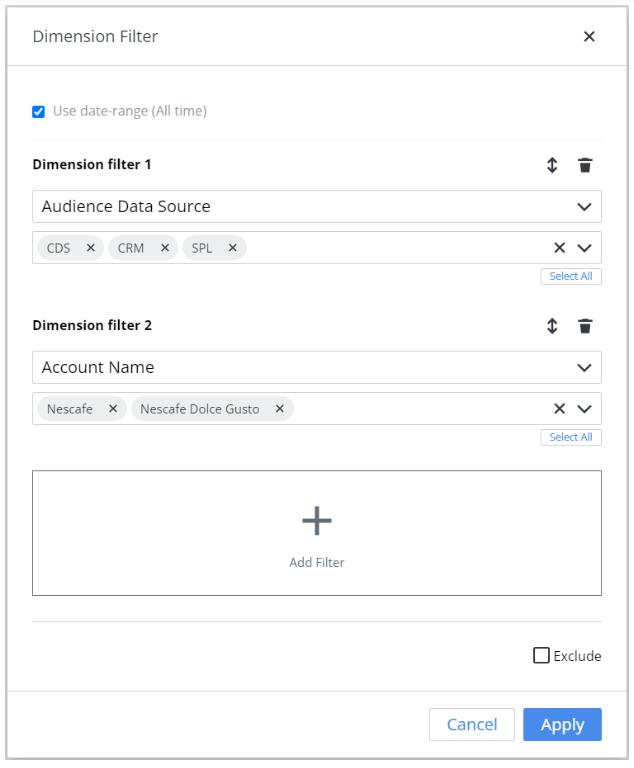
The Dimension Filter window used to add a role-based filter to a role
Adding a role-based filter to an existing role
To add a role-based filter to an existing role, follow these steps:
-
Go to the Administration page.
-
In the secondary menu, click Roles.
-
In the table, find the role to which you want to apply the role-based filter and click Show.
-
In the Dimension filter section, click
Add dimension filter to create a new dimension filter for the role.To add a new dimension filter, follow these steps as shown in the image above:
-
In Choose dimension, select the dimension to use in the filter.
-
In Filter by, select the dimension values that the users assigned to this role can see. To select all the values for the selected dimension, click Select All.
-
(Optional) To add another dimension filter, click + Add Filter.
-
(Optional) To hide the selected dimension value from the user, select the Exclude checkbox.
-
Click Apply.
-
-
(Optional) To save the role-based filter as a filter template, click
Save as filter template, enter a name for the filter template, and click Apply. -
(Optional) To load a role-based filter from a filter template, click
Load filter template, select the filter template to use, and click Apply. -
Click Update.
As a result, you have added a role-based filter to an existing role.
Seeing the role-based filters applied to your role
Role-based filters are applied everywhere you can see data. This includes the views in the Explore page and your dashboards in the Present page. You can see the role-based filters that are applied to your role in the following places:
-
In the Explore page, look at the Role Filters section of a view to see which role-based filters have been applied to your role. The image below shows what a view looks like when a role-based filter is applied to your role.
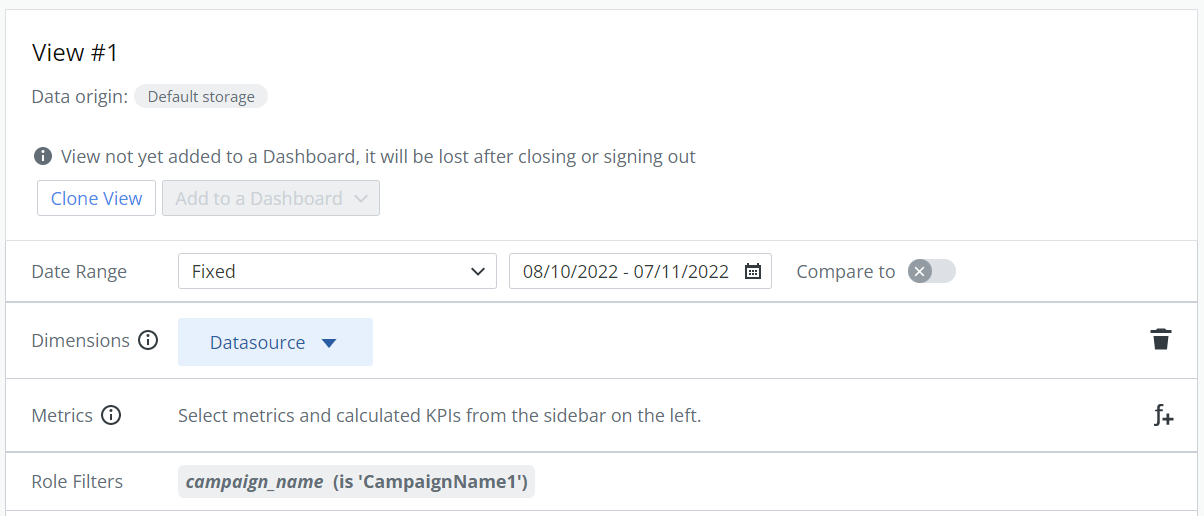
Any role-based filters that are applied to your role appear in the Role Filters section of the view.
-
When viewing a dashboard in the Present page, click on the
 Role-based filter icon to see the role-based filters that are applied to your role. The image below shows what you will see if a role-based filter is applied to your role.
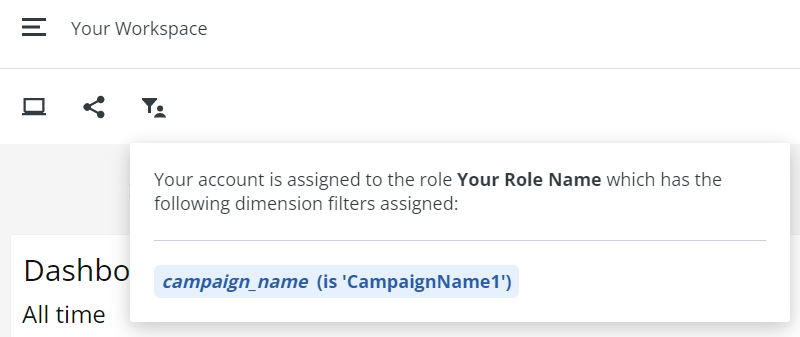
Any role-based filters that are applied to your role appear when you click the Role-based filter icon when viewing a dashboard